Bulk Registration Key Generation for protected Excel workbooks
When there is a need to generate as well as keep track of registration keys for one or more customers – you need to have a special tool which helps to do that in one click. We have created a tool especially for this case – the Bulk Registration Key Generator.
Bulk Registration Key Generator is a tool that allows you to generate multiple registration keys for your customers with one mouse click.
Since the ‘Copy protection with registration key’ feature is only available in Business PRO license of DoneEx XCell compiler or the Professional license of DoneEx VbaCompiler, you may only take advantage of the ‘Bulk Registration Key Generator’ on a computer registered with a Business PRO license for the DoneEx XCell Compiler or the Professional license of DoneEx VbaCompiler.
When you decide to use this tool, you need to download the BulkRegKeyGen Installer as well as run it to install the utility on to your computer. From this moment on you can use this BulkRegKeyGen application as your Bulk Registration Key Generator.
How to Use the ‘Bulk Registration Key Generator’ tool
Open the BulkRegKeyGen.xlsm workbook from one of the generated shortcuts. One should be present on either your desktop or your start menu.
As you can see, the interface of this tool is straight forward. It also corresponds to the ‘Registration Key Tool’ dialog window available under the DoneEx Excel tab.
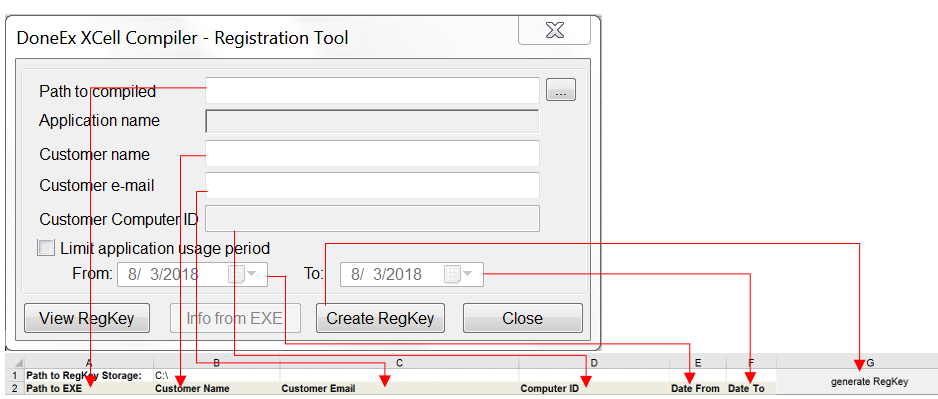
The field B1 and the fields under the columns A, E, and F are clickable. After a double left click with the mouse on those fields, you will get a dialog window. This window allows you to select a target value of the field interactively.
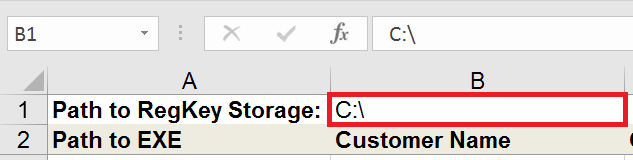
The first thing you need to do is to set the path to your generated registration keys storage. To do that you need to double click on the cell to the right of “Path to RegKey Storage:” (the B1 cell) and select the folder in the opened “Browse” window. In subfolders of this folder you will find all generated registration keys when registration key generation is successfully finished.
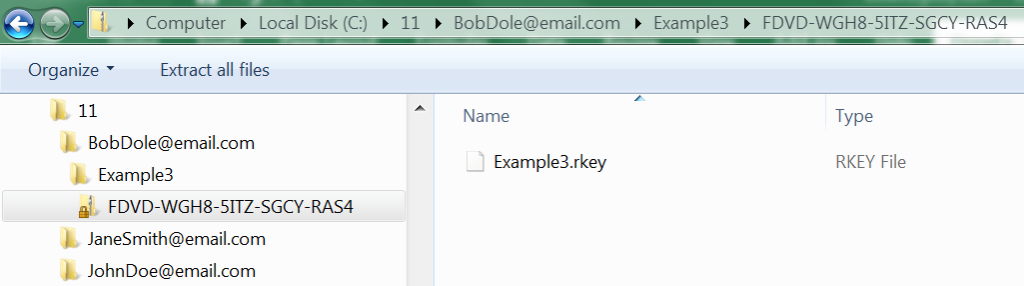
Please notice that all generated registration keys will be saved in this path:
“Path to RegKey storage” >> folder with name of “Customer email” content>> folder with name of “Application Name” content >> zip-file with the customer computer id as its name, which contains the generated registration key. In most cases you will not need to search for the newly generated regkeys in Windows Explorer. This is because, after generation, a hyperlink will appear under column ‘G’. This link will take you straight to the zip-file containing the generated registration key. Just click on that link to get to the file with the registration key.
Fill out customer’s data for registration key generation.
Now you need to enter the path to the EXE file that was compiled with the “Copy Protection” option for which the registration key is going to be generated. To do that you need to double click on a cell in the “A” column, on a row under the “Path to EXE” label, to set the path to the executable file.

In the same row, type in the Customer Name, Customer Email, as well as the Computer ID that the registration key is being generated for. This is done in columns B, C, and D of the registration key tool, respectively.

You can fill out the “Date From” as well as the “Date To” sections. This will restrict the registration key to a time limit. While this step is optional, you must fill out both dates — “Date From” and “Date To”— for this feature to function.

As mentioned before, the fields in columns E and F are double clickable. On a double click you will get calendar window to select the appropriate date.

The utility may highlight cells related to the registration keys you wish to create in orange or red. Be sure to fix the issues in those cells before proceeding.

To create your registration keys, select the first row of information that you have put in with a single right-click. In fact, this can be done on any cell in that row. Continue with a ctrl + right-click on any other rows you wish to create registration keys for.
You can also single right-click on any cell in the first row you wish to create a registration key for, then Shift key+Right-click on any cell in the last row you that wish to create a registration key for. This way, you can select the first, last, as well as any row in-between.

After selecting all of the rows that you wish to create registration keys for, click the “Generate RegKey” button.

At last, you have created a registration key for every row that you have selected in previous step! Just follow any of the newly generated hyperlinks that have appeared under column G. One should be present in every row that you have generated a key for. These hyperlinks lead to the location of their respective registration key.

Finally, to open the folder with the ZIP file that contains the created registration key, you need to click the link in column ‘G’ of the appropriate row.