XCell Compiler Options Overview
The XCell Compiler Options allow you to fulfill all of your XCell workbook compilation needs. DoneEx XCell Compiler can do it all! From password protection and hardware locking to time limited trial versions and EULA inclusion as well as more! All of this while converting Excel workbooks into secure EXE files. Learn and explore the full features provided by DoneEx XCell Compiler in the following breakdown of its wide array of XCell compiler options and features.
- The “DoneEx” tab in the Excel Ribbon Menu. From here you can access all of DoneEx XCell Compiler’s features and functions—numbers 2 through 7 discussed below.
- The “Compile” button brings up the DoneEx XCell Compiler options menu. Numbers 8 to 40 in this options overview cover these options and settings. After setting up these options to your needs, you can compile your workbook into an EXE file.
- The “Load External Data” button brings up the “Import data from file” menu which allows you to import data from a different file.
- The “Registration Key Tool” button brings up the “DoneEx XCell Compiler – Registration Tool” menu. This menu allows you to create a registration key for your workbook.
- The “EXE Options Viewer” button brings up “EXE Options Viewer” dialog, which allows you to load specific compiled executable file to see its options.
- The “Help” button brings up the XCell Compiler web-site which contains information about DoneEx XCell Compiler functionality.
- The “About” button brings up the “About DoneEx XCell Compiler” window, which contains copyright and the product registration information. This button is vital to obtaining your computer ID in the process of registering your DoneEx XCell Compiler license.
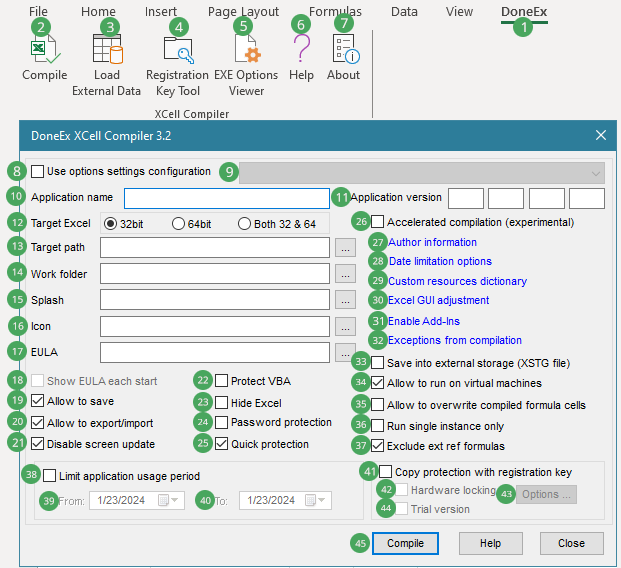
- The “Use options settings configuration” checkbox allows you to use the options setting drop down menu. If the checkbox is checked then the settings from the dropdown menu (which is covered in number 9) are used.
- Option settings drop down menu if the “Use options settings configuration” checkbox is checked on then the settings selected in this drop down menu are used. See how to use options settings configurations details.
- The text in the “Application Name” field becomes the internally used name of your compiled workbook.
- The “Application Version” fields allow you to indicate the current version of the application that you are going to compile.
- The “Target Excel” Radio Buttons allow you to target Excel Bitness: 32-bit, 64-bit, or both 32-bit and 64-bit.
- The “Target Path” field defines the resulting path as well as the name of the executable file after a successful compilation. You must fill out this field for the successful compilation of your workbook.
- The “Work folder” field designates a specific folder that the compiler will use for the temporary files generated during the compilation process. Add this folder to your antivirus exception list to reduce the possibility of false positives.
- The “Splash Image” field, which is enabled by toggling the checkbox next to it, holds the path of the splash image of your application. This splash image will show up at the beginning of every launch of your compiled executable.
- The “Icon” field holds the path of the icon you wish to use for your compiled application. A default executable icon will be used if no valid icon path is given. This field optional for successful compilation.
- The “EULA” field is the destination of the End-User License Agreement (EULA) associated with your application. While this field is optional for successful compilation of your application, it is required for the “Show EULA each start” checkbox described in number 18.
- The “Show EULA each start” checkbox, if enabled, shows the EULA entered in the field to show every time the compiled worksheet is started. If this option is not selected then the EULA will be shown once at the first start of the compiled EXE on a computer.
- The “Allow to save” checkbox toggles the ability to save data to the compiled worksheet. If checked on, this option will allow the user to save the changes they make to the compiled worksheet.
- The “Allow to export/import” checkbox, if checked on, will allow the user to export or import data into the compiled worksheet.
- The “Disable Screen Update” checkbox, if toggled on, will suppress the Excel screen updating during calculating. This can speed up the performance of some worksheets.
- The “Protect VBA” checkbox brings up the “VBA Protection Options” menu, through which you can setup strong VBA code protection of your worksheet.
- The “Hide Excel” checkbox, if toggled on, makes Excel invisible on the launch of the compiled executable file. This option requires you to control the visibility of Excel from your VBA code.
- The “Password protection” checkbox, when checked on, brings up a window that allows you to enter a password to protect your compiled application.
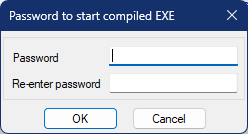 Once password-protected, the compiled EXE file will prompt for the set password every time it starts. If the entered password is incorrect, the compiled workbook will not open.
- The “Quick Protection” checkbox, if toggled on, improves calculation performance when worksheets have password protection. Please note that if your VBA code controls worksheet protection by using worksheet.protect/unprotect statements then you should not select this option.
- Accelerated compilation (Experimental). You can use this option for faster compilation of big and complex workbooks. Please note that the option is experimental and may not work for some workbooks. If you have selected this option and the compilation of your workbook fails, then disable this option.
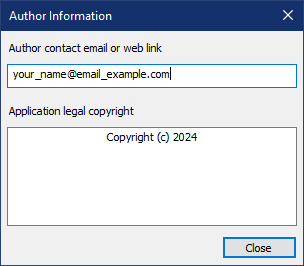
- The “Author information” hypertext brings up the “Author Information” window. This window has a field for storing author contact information or weblink as well as application legal copyright information on the compiled workbook. The email or web-link will be used when the end user clicks “Contact Author” button in the compiled workbook run-time messages or dialogs.
- The “Date limitation options” hypertext brings up the “Date Limitation Options” window. In this window you can customize the type of date verification used on your compiled workbook. This can be “Internet only”, “System clock only”, or both system clock and internet. This window also allows you to set system clock insensitivity time. This determines the maximum hour difference between system clock can have before the application ceases to launch. In the “Date Limitation Options” window you can also set an expiration warning. This starts to show an expiration warning a certain amount of days before expiration (which you can set). This option also shows the renew/upgrade instructions. These instructions can be the default message or a message contained in a custom text file set by you.
- The “Custom resources dictionary” hypertext brings up the “Select Custom Resources Dictionary” window. In this window you can set a path to a custom resource dictionary used by your workbook.
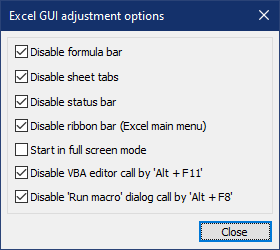
- “Excel GUI adjustment” hypertext link brings up the “Excel GUI adjustment options” window. As part of the XCell Compiler options, the Excel GUI adjustment options allow to modify Excel GUI for run-time. These XCell Compiler options are not security features because any of these run-time behavior changes may be overridden by the customer.
- “Enable AddIns” hypertext brings up a window where you can select which addins to enable in the resulting EXE file.
- “Exceptions from compilation” hypertext brings up a window in which you can index cell ranges. The compiler will not compile these cell ranges.
- The “Save into external storage (XSTG) file” checkbox. If enabled, it keeps the compiled file unchanged and allows it to save all changes into the external storage—XSTG filetype.
- The “Allow to run on virtual machines” checkbox. If enabled, it disables the virtual machine detection system and allows your workbook to run on virtual machines.
- The “Allow to overwrite compiled formula cells” option enables writing values into cells that originally contained formulas before compilation. When you select this option during compilation, it becomes possible to overwrite any cell with a formula in the compiled workbook and change it to a value. Overwriting the cell will cause the cell to no longer perform calculations. This is because overwriting the cell removes the formula. This behavior is similar to what happens in the original workbook when you manually overwrite a formula with a value.
- The “Run single instance only” checkbox. If enabled, the checkbox makes it so that only one instance of the compiled workbook can run on one computer at a time.
- The “Exclude ext ref formulas” checkbox, when turned on, excludes all formulas that have an external workbook reference from compilation. This can improve the performance speed of your compiled workbook.
- The “Limit application usage period” checkbox, when toggled on, allows you to set the start and end date between which the user can use the compiled workbook. The “Limit application usage period” and the “Copy protection with registration key” (covered in number 36) settings are mutually exclusive.
- The “Application usage period start date” field allows you to set the start date of the usage period of your compiled workbook with the “Limit application usage period” checkbox enabled.
- The “Application usage period end date” field allows you to set the end date of the usage period of your compiled workbook with the “Limit application usage period” checkbox enabled.
- The “Copy protection with registration key” checkbox allows you to protect your compiled executable file. It also allows you to use the “Copy protection with registration key” settings (numbers 42, 43, and 44) when enabled. The “Limit application usage period” (covered in number 38) and the “Copy protection with registration key” settings are mutually exclusive.
- The “Hardware locking” checkbox enables hardware locking protection for your compiled EXE file. This locks the compiled EXE file to the target computer with a registration key file. This setting takes information from the “Options” button (covered in number 43).
- The “Options” button for hardware locking brings up the “Registration Key Options” menu. This menu allows you to set the name of the registration key file in the “registration key file name” field. It also allows you to set the path that the compiled application will search for the registration key file every time it starts.
- The “Trial version” checkbox allows you to set a trial period for your compiled EXE file. It also brings up the “Trial Version Options” menu. In this menu you can set the amount of days the trial period of your compiled application lasts. You can also set the amount of time in seconds before the close button becomes available on the trial version nag window, as well as the amount of time in minutes of the interval between warning recalls.
- The XCell Compiler “Compile” button compiles your workbook into a functioning EXE file with the best protection available.